VMware ESXi can take advantage of Flash/local SSDs in multiple ways:
- Host swap cache (since 5.0): ESXi will use part of the an SSD datastore as swap space shared by all VMs. This means that when there is ESX memory swapping, the ESXi server will use the SSD drives, which is faster than HDD, but still slower than RAM.
- Virtual SAN (VSAN) (since 5.5 with VSAN licensing): You can combine the local HDD and local SSD on each host and basically create a distributed storage platform. I like to think of it as a RAIN(Redundant Array of Independent Nodes).
- Virtual Flash/vFRC (since 5.5 with Enterprise Plus): With this method the SSD is formatted with VFFS and can be configured as read and write through cache for your VMs, it allows ESXi to locally cache virtual machine read I/O and survives VM migrations as long as the destination ESXi host has Virtual Flash enabled. To be able to use this feature VMs HW version needs to be 10.
Check if the SSD drives were properly detected by ESXi
From vSphere Web Client
Select the ESXi host with Local SSD drives -> Manage -> Storage -> Storage Devices
See if it shows as SSD or Non-SSD, for example:
From CLI:
~ # esxcli storage core device list
...
naa.60030130f090000014522c86152074c9
 Display Name: Local LSI Disk (naa.60030130f090000014522c86199898)
 Has Settable Display Name: true
 Size: 94413
 Device Type: Direct-Access
 Multipath Plugin: NMP
 Devfs Path: /vmfs/devices/disks/naa.60030130f090000014522c86199898
 Vendor: LSI
 Model: MRSASRoMB-8i
 Revision: 2.12
 SCSI Level: 5
 Is Pseudo: false
 Status: on
 Is RDM Capable: false
 Is Local: true
 Is Removable: false
 Is SSD: false  <-- Not recognized as SSD
 Is Offline: false
 Is Perennially Reserved: false
 Queue Full Sample Size: 0
 Queue Full Threshold: 0
 Thin Provisioning Status: unknown
 Attached Filters:
 VAAI Status: unsupported
 Other UIDs: vml.020000000060030130f090000014522c86152074c94d5253415352
 Is Local SAS Device: false
 Is Boot USB Device: false
 No of outstanding IOs with competing worlds: 32
...
To enable the SSD option on the SSD drive
At this point you should put your host in maintenance mode because it will need to be rebooted.
If the SSD is not properly detected you need to use storage claim rules to force it to be type SSD. (This is also useful if you want to fake a regular drive to be SSD for testing purposes)
# esxcli storage nmp device list
...
naa.60030130f090000014522c86152074c9   <-- Take note of this device ID for the command below
 Device Display Name: Local LSI Disk (naa.60030130f090000014522c86152074c9)
 Storage Array Type: VMW_SATP_LOCAL
 Storage Array Type Device Config: SATP VMW_SATP_LOCAL does not support device configuration.
 Path Selection Policy: VMW_PSP_FIXED
 Path Selection Policy Device Config: {preferred=vmhba2:C2:T0:L0;current=vmhba2:C2:T0:L0}
 Path Selection Policy Device Custom Config:
 Working Paths: vmhba2:C2:T0:L0
 Is Local SAS Device: false
 Is Boot USB Device: false
...
Add a PSA claim rule to mark the device as SSD (if it is not local (e.g. SAN))
# esxcli storage nmp satp rule add --satp=<SATP_TYPE> --device=<device ID> --option="enable_ssd"
For example (in case this was a SAN attached LUN)
# esxcli storage nmp satp rule add --satp=VMW_SATP_XXX --device=naa.60030130f090000014522c86152074c9 --option="enable_ssd"
Add a PSA claim rule to mark the device as Local and SSD at the same time (if the SSD drive is local)
# esxcli storage nmp satp rule add –-satp=VMW_SATP_LOCAL –-device=<device ID> --option="enable_local enable_ssd"
For the device in my example it would be:
# esxcli storage nmp satp rule add --satp=VMW_SATP_LOCAL --device=naa.60030130f090000014522c86152074c9 --option="enable_local enable_ssd"
Reboot your ESXi host for the changes to take effect.
To remove the rule (for whatever reason, including testing and going back)
esxcli storage nmp satp rule remove --satp VMW_SATP_LOCAL --device <device ID> --option=enable_ssd
esxcli storage nmp satp list |grep ssd
esxcli storage core claiming reclaim -d <device ID>
esxcli storage core device list --device=<device ID>
Once the ESXi server is back online verify that the SSD option is OK
From vSphere Web Client
Select the ESXi host with Local SSD drives -> Manage -> Storage -> Storage Devices
See if it shows as SSD or Non-SSD, for example:
From CLI:
~ # esxcli storage core device list
...
naa.60030130f090000014522c86152074c9
 Display Name: Local LSI Disk (naa.60030130f090000014522c86152074c9)
 Has Settable Display Name: true
 Size: 94413
 Device Type: Direct-Access
 Multipath Plugin: NMP
 Devfs Path: /vmfs/devices/disks/naa.60030130f090000014522c86152074c9
 Vendor: LSI
 Model: MRSASRoMB-8i
 Revision: 2.12
 SCSI Level: 5
 Is Pseudo: false
 Status: on
 Is RDM Capable: false
 Is Local: true
 Is Removable: false
 Is SSD: true  <-- Now it is true
 Is Offline: false
 Is Perennially Reserved: false
 Queue Full Sample Size: 0
 Queue Full Threshold: 0
 Thin Provisioning Status: unknown
 Attached Filters:
 VAAI Status: unsupported
 Other UIDs: vml.020000000060030130f090000014522c86152074c94d5253415352
 Is Local SAS Device: false
 Is Boot USB Device: false
 No of outstanding IOs with competing worlds: 32
...
Exit Maintenance mode.
Do the same on ALL hosts in the cluster.
Configure Virtual Flash
Now that the ESXi server recognize the SSD drives we can enable Virtual Flash.
You need to perform the below steps from the vSphere Web Client on all ESX hosts
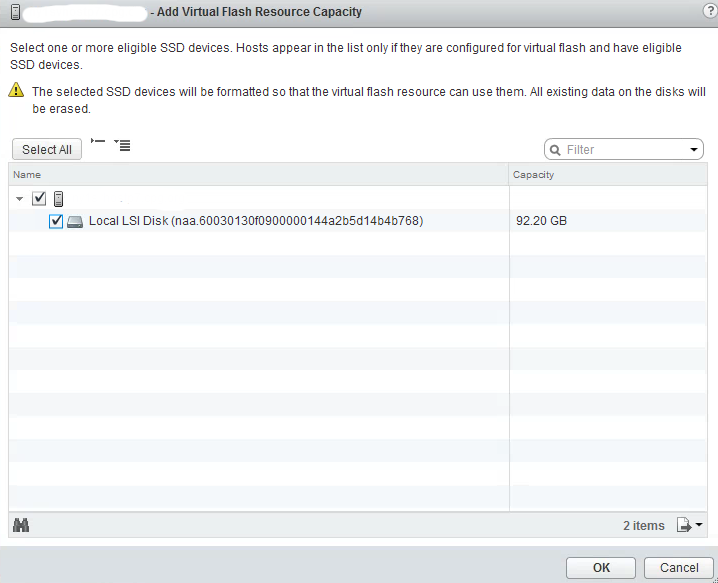
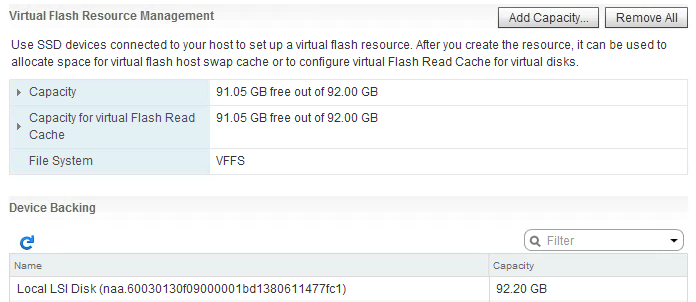
ESXi host -> Manage -> Settings -> Virtual Flash -> Virtual Flash Resource Management -> Add Capacity…
You will see that the SSD device has been formatted using the VFFS filesystem, it can be used to allocate space for virtual flash host swap cache or to configure virtual Flash Read Cache for virtual disks.
Configure Virtual Flash Host Swap
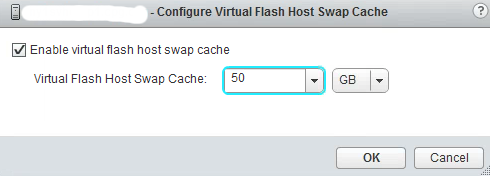
One of the options you have is to use the Flash/SSD as Host Swap Cache, to do this:
ESXi host -> Manage -> Settings -> Virtual Flash -> Virtual Flash Host Swap Cache Configuration -> Edit…
// Enable and select the size of the cache in GB
Configure Flash Read Cache
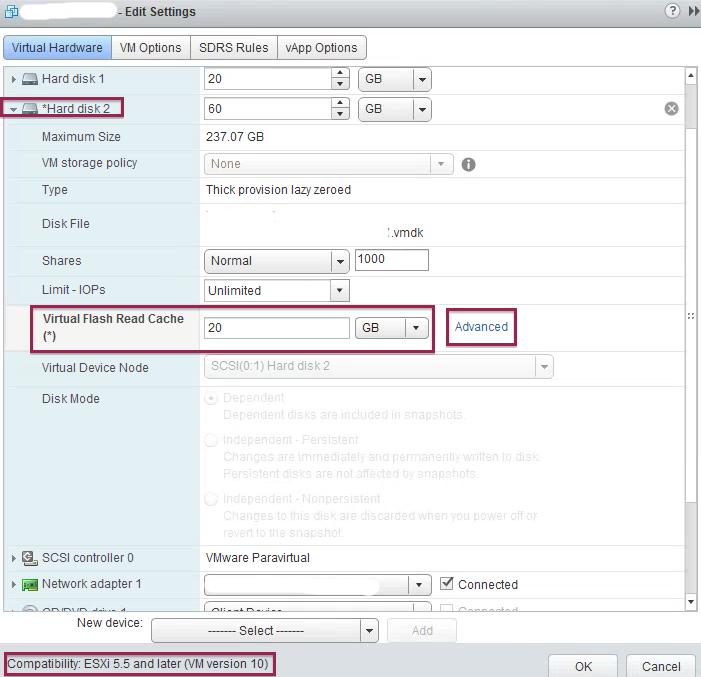
Flash read cache is configured on a per-vm basis, per vmdk basis. VMs need to be at virtual hardware version 10 in order to use vFRC.
To enable vFRC on a VM’s harddrive:
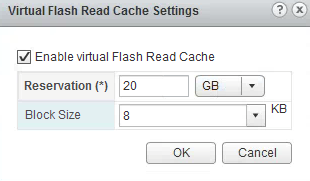
VM -> Edit Settings -> Expand Hard Disk -> Virtual Flash Read Cache
Enter the size of the cache in GB (e.g. 20)
You can start conservative and increase if needed, I start with 10% of the VMDK size. Below, in the monitor vFRC section, you will see tips to rightsize your cache.
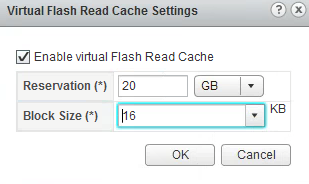
If you click on Advanced, you can configure/change the specific block-size (default is 8k) for the Read Cache, this allows you to optimize the cache for the specific workload the VM is running.
The default block size is 8k, but you may want to rightsize this based on the application/workload to be able to efficiently use the cache.
If you dont size the block-size of the cache you could potentially be affecting the efficiency of the cache:
- If the workload has block sizes larger than the configured block-size then you will have increased cache misses.
- If the workload has block sizes smaller than the configured block-size then you will be wasting precious cache.
Size correctly the block-size of your Cache
To correctly size the block-size of your cache you need to determine the correct I/O length/size for cache block size:
Login to the ESX host running the workload/VM for which you want to enable vFRC
Find world ID of each device
~ # /usr/lib/vmware/bin/vscsiStats -l
Virtual Machine worldGroupID: 44670, Virtual Machine Display Name: myvm, Virtual Machine Config File: /vmfs/volumes/523b4bff-f2f2c400-febe-0025b502a016/myvm/myvm.vmx, {
 Virtual SCSI Disk handleID: 8194 (scsi0:0)
 Virtual SCSI Disk handleID: 8195 (scsi0:1)
 }
...
Start gathering statistics on World ID // Give it some time while it captures statistics
~ # /usr/lib/vmware/bin/vscsiStats -s -w 44670
 vscsiStats: Starting Vscsi stats collection for worldGroup 44670, handleID 8194 (scsi0:0)
 Success.
 vscsiStats: Starting Vscsi stats collection for worldGroup 44670, handleID 8195 (scsi0:1)
 Success.
Get the IO length histogram to find the most dominant IO length
You want the IO length for the harddisk you will enable vFRC, in this case scsi0:1
(-c means compressed output)
~ # /usr/lib/vmware/bin/vscsiStats -p ioLength -c -w 44670
...
Histogram: IO lengths of Write commands,virtual machine worldGroupID,44670,virtual disk handleID,8195 (scsi0:1)
 min,4096
 max,409600
 mean,21198
 count,513
 Frequency,Histogram Bucket Limit
 0,512
 0,1024
 0,2048
 0,4095
 174,4096
 0,8191
 6,8192
 1,16383
 311,16384
 4,32768
 1,49152
 0,65535
 2,65536
 1,81920
 1,131072
 1,262144
 11,524288
 0,524288
...
As you can see, in this specific case, 16383(16k) is the most dominant IO length, and this is what you should use in the Advance options.
Now you are using a Virtual Flash Read Cache on that VM’s harddisk, which should improve the performance.
Monitor your vFRC
Login to the ESX host running the workload/VM for which you enabled vFRC, in the example below it is a 24GB Cache with 4K block-size:
# List physical Flash devices
 ~ # esxcli storage vflash device list
 Name Size Is Local Is Used in vflash Eligibility
 -------------------- ----- -------- ----------------- ---------------------------------
 naa.500a07510c06bf6c 95396 true true It has been configured for vflash
 naa.500a0751039c39ec 95396 true true It has been configured for vflash
# Show virtual disks configured for vFRC. You will find the vmdk name for the virtual disk in the cache list:
 ~ # esxcli storage vflash cache list
 vfc-101468614-myvm_2
# Get Statistics about the cache
~ # esxcli storage vflash cache stats get -c vfc-101468614-myvm_2
   Read:
         Cache hit rate (as a percentage): 60
         Total cache I/Os: 8045314
         Mean cache I/O latency (in microseconds): 3828
         Mean disk I/O latency (in microseconds): 13951
         Total I/Os: 13506424
         Mean IOPS: 249
         Max observed IOPS: 1604
         Mean number of KB per I/O: 627
         Max observed number of KB per I/O: 906
         Mean I/O latency (in microseconds): 4012
         Max observed I/O latency (in microseconds): 6444
   Evict:
         Last I/O operation time (in microseconds): 0
         Number of I/O blocks in last operation: 0
         Mean blocks per I/O operation: 0
   Total failed SSD I/Os: 113
   Total failed disk I/Os: 1
   Mean number of cache blocks in use: 5095521
There is a lot of important information here:
The Cache hit rate shows you the percentage of how much the cache is being used. A high number is better because it means that hits use the cache more frequently.
Other important items are IOPs and latency.
This stats also show information that can help you right size your cache, if you see a high number of cache evictions, Evict->Mean blocks per I/O operation, it could be an indication that your cache size is small or that the block-size of the cache is incorrectly configured.
To calculate available block in the cache, do the following:
SizeOfCache(in bytes) / BlockSizeOfCache(in bytes) = #ofBlocksInvFRC
For the example: A 24GB cache with 4k block-size, will have 6291456 blocks in the vFRC, see:
25769803776
/
4096
=
6291456
In the stats above we see 5095521 as the Mean number of cache blocks in use, and no evictions which indicates that 24GB cache with 4k seems to be a correctly sized cache.
Keep monitoring your cache to gain as much performance as you can from your Flash/SSD devices.

Comments
Leave a comment Trackback