Technologist

Tech stuff about Cloud, DevOps, SysAdmin, Virtualization, SAN, Hardware, Scripting, Automation and Development

Browsing Posts in Windows

The following PowerShell one liners will help you in getting a list of files and/or folders in a given folder.
It can be useful to capture this information in a text file for later processing or even a spreadsheet.

PowerShell is very powerful in that it returns objects that you can manipulate.

For Example, to return the list of ONLY directories on the C:\ drive:

PS C:\> Get-ChildItem | where {$_.PsIsContainer}

Mode LastWriteTime Length Name
—- ————- —— —-
d—- 3/12/2009 12:28 PM Projects
d—- 6/10/2010 9:38 AM cygwin
d—- 9/21/2010 7:02 PM Documents and Settings

Get-ChildItem can be run with no arguments to get all items, just like a ‘dir’ command.
In fact, dir, ls, gci are aliases of the Get-ChildItem cmdlet.

In the following example, I will get the list of ONLY the directories and then from this I will take only the name. Also, I will use the alias ‘dir’

PS C:\> dir | where {$_.PsIsContainer} | Select-Object Name

Name
—-
Projects
cygwin
Documents and Settings

If you wish to get the list of ONLY files, you just need to negate the where condition:
where {!$_.PsIsContainer}

PS C:\> Get-ChildItem | where {!$_.PsIsContainer} | Select-Object Name

Name
—-
.rnd
AUTOEXEC.BAT
CONFIG.SYS
cygwin.lnk
install_log

You can redirect this output to a text file for later processing:

PS C:\> Get-ChildItem | where {!$_.PsIsContainer} | Select-Object Name > onlyFiles.txt

Now let’s take it one step further and send this output to a CSV(Comma Separated Values) file.

PS C:\> Get-ChildItem | where {!$_.PsIsContainer} | Select-Object Name | Export-Csv onlyFiles.csv
Problem:
I needed to send confidential data to other people via the Internet, so it needs to be encrypted.

Solution:
GPG is the free implementation of the OpenPGP(Preety Good Privacy) standard defined by RFC4880.
It provides a way to encrypt data using a public/private key infrastructure. You can set a Web of Trust with the people you need to share data, get their public keys, send them your public key and start encrypting and decrypting as I will show you in this guide.
GPG is available is diferent platforms including Linux, MAC, Windows(Binary version as well as in Cygwin).
you can use the OS of your choice, just make sure GPG is installed

For this demo I am using a Mac with OS 10.6

1) Make sure you have GPG installed, otherwise downloaded from http://gnupg.org/download/index.en.html
To check type:

mac:~ john$ gpg --version
gpg (GnuPG) 1.4.10
Copyright (C) 2008 Free Software Foundation, Inc.
License GPLv3+: GNU GPL version 3 or later 
This is free software: you are free to change and redistribute it.
There is NO WARRANTY, to the extent permitted by law.

Home: ~/.gnupg
Supported algorithms:
Pubkey: RSA, RSA-E, RSA-S, ELG-E, DSA
Cipher: 3DES, CAST5, BLOWFISH, AES, AES192, AES256, TWOFISH, CAMELLIA128, 
        CAMELLIA192, CAMELLIA256
Hash: MD5, SHA1, RIPEMD160, SHA256, SHA384, SHA512, SHA224
Compression: Uncompressed, ZIP, ZLIB, BZIP2
 

2) Generate your Private/Public Key Pair
CHOOSE THE ALGORITHM, NUMBER OF BITS AND EXPIRATION DATE (Defaults are fine)

mac:~ john$  gpg --gen-key
gpg (GnuPG) 1.4.10; Copyright (C) 2008 Free Software Foundation, Inc.
This is free software: you are free to change and redistribute it.
There is NO WARRANTY, to the extent permitted by law.

Please select what kind of key you want:
   (1) RSA and RSA (default)
   (2) DSA and Elgamal
   (3) DSA (sign only)
   (4) RSA (sign only)
Your selection? 1
RSA keys may be between 1024 and 4096 bits long.
What keysize do you want? (2048) 
Requested keysize is 2048 bits   
Please specify how long the key should be valid.
         0 = key does not expire
        = key expires in n days
      w = key expires in n weeks
      m = key expires in n months
      y = key expires in n years
Key is valid for? (0) 
Key does not expire at all
Is this correct? (y/N) y

You will get a warning about the expiration if you selected the default, which means it never expires.
If you want it to expire then change the value(eg 3m) will expire in 3 months.

                     
You need a user ID to identify your key; the software constructs the user ID
from the Real Name, Comment and Email Address in this form:
    "Heinrich Heine (Der Dichter) "

Enter Real Name, Email and a Comment.
Try to make this as unique as possible as this will have an inpact in how your key is identified

Real name: John
Email address: john@technologist.pro
Comment: Technologist               
You selected this USER-ID:
    "John (Technologist) "

Change (N)ame, (C)omment, (E)mail or (O)kay/(Q)uit? O
You need a Passphrase to protect your secret key.    

You don't want a passphrase - this is probably a *bad* idea!
I will do it anyway.  You can change your passphrase at any time,
using this program with the option "--edit-key".

Select an empty Passphrase UNLESS you dont mind to be prompted everytime for the passphrase
Now Just wait a few seconds while the key is generated, Move the mouse and type on the keyboard to increase the randomness.

We need to generate a lot of random bytes. It is a good idea to perform
some other action (type on the keyboard, move the mouse, utilize the
disks) during the prime generation; this gives the random number
generator a better chance to gain enough entropy.
+++++
.....+++++

In Case you get:
Not enough random bytes available.
Please do some other work to give the OS a chance to collect more entropy! (Need 284 more bytes)

DON’T PANIC, Just do stuff in your PC, write things to disk, log in to another terminal with a different user, etc.
Just do different things, that collect more entropy.

gpg: /Users/john/.gnupg/trustdb.gpg: trustdb created
gpg: key CAJD4CD7 marked as ultimately trusted
public and secret key created and signed.

gpg: checking the trustdb
gpg: 3 marginal(s) needed, 1 complete(s) needed, PGP trust model
gpg: depth: 0  valid:   1  signed:   0  trust: 0-, 0q, 0n, 0m, 0f, 1u
pub   2999R/CAJD4CD7 2010-03-04
      Key fingerprint = 901C XXXX 94F8 7332 XXXX  1DDA 2C07 B0A5 CE4D 4CD7
uid                  John  (Technologist) 
sub   2048R/ABBB7BDC 2010-03-04

OK the set up is done, Now we need to give people in our Web of Trust (Fancy terminology for “people we trust and trust us”) our public key so they can encrypt data with our public key, so we can open it using our Private Key and
we need to get their public key to encrypt data with their public key so that they can open it using their Private Key

For Example:
If I(John) need to send an encrypted document to Ann, I need to have her Public Key, Encrypt the Data with her Public key so she can decrypt it using her Private key. It’s all about the Private/Public Key Pairs.

3) Give the people you trust your public key and get their public key
You can get the public Key by any means, including the internet, email, etc.
The public key is supposed to be public, But on the other hand, guard your Private Key with your life, it should be only readable by the owner and no one else.

Check your keys by listing them:

mac:~ john$ gpg --list-keys
/Users/john/.gnupg/pubring.gpg
--------------------------------
pub   2999R/CAJD4CD7 2010-03-04
uid                  John (Technologist) 
sub   2048R/ABBB7BDC 2010-03-04

Now Export that key into a file:
-r option tells gpg which public key to export in case you generated more than one Private/Public Key Pairs.
-o tells the output filename
–armor option is to output in a format that is understood by many applications, otherwise it will be output in gpg raw format

mac:~ john$ gpg --export -r "John Technologist" --armor -o JohnTechnologist.pub

The contents of the file should look like this:

—–BEGIN PGP PUBLIC KEY BLOCK—–
Version: GnuPG v1.4.10 (Darwin)

mXENBEuXCxsBCADVTdygxzkXHRgOq+i+0b7LF/pilPPJSaO1I8k1Yspa8b5onYio
1JzzPZNj2ptjnzay1tjUuLwX0tvvsG+PCBKqQLMz0ozampIjDXj379p837Omx9TV
OBFPibXazwpZEP1bBK7p6siyDh0Q72pq0zJbhwR4ptcwNheNLnN2hfAiJRTSohZo
0cbg6FRrCBCYU58cemco7QhiFcrZSY1KNzhhiQUXuAvRvoQ54FSAtTJBpEH/wkuF
WhNK+SHkn/+e99cQ4NQW8ncgrrJEYAdFvIOlABEBAAG0MUpvaG4gR2FsbG8gKFRl
Y2hub2xvZ2lzdCkgPGpvaG5AdGVjaG5vbG9naXN0LnBybz6JATgEEwECACIFAkuQ
5LaLgEs3P8KzUGbVfD41qEtLrobqG8VBuJcob4sy4FOYSW+H2tT4/XZ0n6lkTi8H
TvzTekiO3K9S1hIg+eHwNJgV8reQdRPvEuPhoOehqfHC77e11RhV2bn84mKVRoVl
VY1DkE46fz+pVqA5GSsfi7vLMIVvX/koDCbizkmxNOktdXP3ds+i7y1mIv+WEEb+
1NQYJNIZmNnmW9e6eg3mAjf99ruepd+r2OP0hBgLWxypPKsjz7VXmqiwbilzkqM5
axJPL2IP4OwRBIjV9hv5fpV17MPbdHmTh0JXGfnSMGEZai7CIpbSOWQY/nnhOjht
PQQO2xGRTcWmIwySqzCFmSiUIdONnuqwBpY5OrSTe00i//yDY/VZfZwg8qsChh3b
jlb9CRvAM6/CZFFKzkm5AQ0ES5ALGwEIAKpF1iJj0k3XvemTb+ze11SJa+Z/Rr+V
19Z7GVgTYOwu4DrNjrPuecOQ9hSzO8aWhZTpTOR9XlPcnFhgz1YKBZbHr8s/SP5r
7vlRxmE3kqEXtZ7R5IT35R6t+FJSY9H7cndcKSYQQFynAyFqslPIvEqONtWnPORn
pCEp+K5mPRiUfcObtd0TuR/C0tVUGViVs+PhVhSnoU7V6aEQNLHC4+ltsqhOSbMZ
FB3LWYGuQ33Rh4O/3raB/0ZBTKWl7nmBXyNHO6MpPQGQxSlpXPQKLukWoKIKErhX
Obs+of0Mn/dIU/vRxdtYOZ6cg1oIp0zcpzw7sYddw2AoftfH51L5h/MAEQEAAYkB
HwQYAQIACQUCS5ALGwIbDAAKCRAsB7Clzk1M19taCACSGcHuvyW0HqCyrNLO9Knj
hfAZp0OxxGBiOQbjwdG/DIeUfH9kSIlUEW8aYHUkpzYrPWMsuXy/AdeWyqy54wgD
zxmQb7SogwG2AqzLX2KoiyHJuWleRc9dxbCgByqQyPYyEfVWZykDlNueaZ1NyfQn
MFn5YqxbCBZHpo4hw5XhPJFwP8/kVjT2bQ0ctSPk5USxtxHEyP6vByEpuuBRJTEe
nHlK7/V7WJNnNQPeg6DlvA/TjsQPmuxbodxVkt04dvwoJkBiQIVsRoPRnX0VvoA1
GeLSaCyUIKWA3YnnSuGYKmQyHD9EmZPxiCGPL4tMzvjNUfJsde1QfbjsJ5W2Ti+T
=be1t
—–END PGP PUBLIC KEY BLOCK—–

4) Send that public key file to your friend and your friend will send you his public key exported from his system.
When you get his Public Key (his file), then you need to import it into your key ring like this:
Lets say Ann Dexter sent me through email her public key file called AnnDexter.pub

mac:~ john$ gpg --import AnnDexter.pub

Listing the keys will yield

mac:~ john$ gpg --list-keys
/Users/john/.gnupg/pubring.gpg
--------------------------------
pub   2999R/CAJD4CD7 2010-03-04
uid                  John (Technologist) 
sub   2048R/ABBB7BDC 2010-03-04

pub 1024D/9B2A3DA2 2008-04-01 
uid Ann Dexter (Systems) 
sub 2048g/AB00C1A4 2008-04-01

5) We want to encrypt secret.txt using Ann’s Pubilc Key
And it is as simple as:

mac:~ john$ gpg --encrypt --sign --armor -r "Ann Dexter" secret.txt

This will generate a secret.txt.asc file which is the encrypted version of secret.txt AND Signed so the recipient can verify it came from you
This file can ONLY be decrypted with Ann Dexter PRIVATE KEY, you CAN’T decrypt it because you ONLY posses Ann Dexter’s Public Key but NOT her Private Key.

Now You can send the secret.txt.asc to Ann using any means you want, email, ftp, etc.

6) Ann Dexter got your encrypted file, how does she decrypt it?
Since she posseses the Private Key she can just do the following:

[ann@remoteSystem]$ gpg --decrypt -o secret.txt secret.txt.asc

And She will get the following the following output indicating that the Private key was used to Decrypt the file.

gpg: encrypted with 2048-bit ELG-E key, ID AB00C1A4, created 2008-04-01 “Ann Dexter (Systems) ”

Ann should now have the secret.txt file ready and decrypted

This guide helps measure the network throughput and bandwidth between two hosts in the same network, different networks and across different data centers.

This specifically helped me when I needed to know how much throughput the company network had between headquarters data center and the Disaster Recovery data center which where in different states and I wanted to calculate how long would it take to replicate our SAN between the sites, about 60TB of data.

The tool I used for this is called iPerf (http://sourceforge.net/projects/iperf/), this tool includes both the Server and Client, I am running this tool from a RHEL 5.3 system.

You can find a RHEL/Centos binary for this tool at http://dag.wieers.com/rpm/packages/iperf/

A Java based Graphical iperf tool can be found at http://code.google.com/p/xjperf/downloads/list, which can be run on a Windows system, with the Java runtime environment.

Now let’s get to the steps on how to measure network throughput.

1) Set up the iperf server

I am utilizing a RHEL 5.3 for the server.

Install iperf:

[root@remote]# rpm -Uvh http://dag.wieers.com/rpm/packages/iperf/iperf-2.0.2-2.el5.rf.x86_64.rpm

Run iperf as server:

[root@remote ~]# iperf -s
————————————————————
Server listening on TCP port 5001
TCP window size: 85.3 KByte (default)
————————————————————

Now that the iperf server is running, install the client at the other office.

2) Set up the iperf client on RHEL

Install iperf on RHEL:

[root@local]# rpm -Uvh http://dag.wieers.com/rpm/packages/iperf/iperf-2.0.2-2.el5.rf.x86_64.rpm

Run iperf as client on RHEL:

iperf has many great options, you can see all the options by doing # iperf -h

I usually use the following options to determine throughput:

[root@local ~]# iperf -c 10.3.3.3 -fk // 10.3.3.3 is the remote server -fk is to present as kbps
————————————————————
Client connecting to 10.3.3.3, TCP port 5001
TCP window size: 16.0 KByte (default)
————————————————————
[ 3] local 10.2.2.2 port 38124 connected with 10.3.3.3 port 5001
[ ID] Interval Transfer Bandwidth
[ 3] 0.0-10.3 sec 37680 KBytes 30029 Kbits/sec

Server screen Output:

————————————————————
Server listening on TCP port 5001
TCP window size: 85.3 KByte (default)
————————————————————
[ 4] local 10.3.3.3 port 5001 connected with 10.2.2.2 port 38124
[ 4] 0.0-10.9 sec 36.8 MBytes 28.3 Mbits/sec

Using the -r option to “Do a bidirectional test individually”

[root@local ~]# iperf -c 10.3.3.3 -fk -r
————————————————————
Server listening on TCP port 5001
TCP window size: 85.3 KByte (default)
————————————————————
————————————————————
Client connecting to 10.3.3.3, TCP port 5001
TCP window size: 16.0 KByte (default)
————————————————————
[ 5] local 10.2.2.2 port 41973 connected with 10.3.3.3 port 5001
[ ID] Interval Transfer Bandwidth
[ 5] 0.0-10.1 sec 27744 KBytes 22580 Kbits/sec
[ 4] local 10.2.2.2 port 5001 connected with 10.3.3.3 port 55521
[ 4] 0.0-10.1 sec 48160 KBytes 39093 Kbits/sec

Server screen Output:

————————————————————
Server listening on TCP port 5001
TCP window size: 85.3 KByte (default)
————————————————————
[ 4] local 10.3.3.3 port 5001 connected with 10.2.2.2 port 41973
[ 4] 0.0-10.7 sec 27.1 MBytes 21.3 Mbits/sec
————————————————————
Client connecting to 10.2.2.2, TCP port 5001
TCP window size: 16.0 KByte (default)
————————————————————
[ 4] local 10.3.3.3 port 55521 connected with 10.2.2.2 port 5001
[ 4] 0.0-10.0 sec 47.0 MBytes 39.3 Mbits/sec

Using the -d option to “Do a bidirectional test simultaneously”

[root@local ~]# iperf -c 10.3.3.3 -fk -d
————————————————————
Server listening on TCP port 5001
TCP window size: 85.3 KByte (default)
————————————————————
————————————————————
Client connecting to 10.3.3.3, TCP port 5001
TCP window size: 16.0 KByte (default)
————————————————————
[ 5] local 10.2.2.2 port 41974 connected with 10.3.3.3 port 5001
[ 4] local 10.2.2.2 port 5001 connected with 10.3.3.3 port 40886
[ ID] Interval Transfer Bandwidth
[ 5] 0.0-10.1 sec 37872 KBytes 30648 Kbits/sec
[ 4] 0.0-10.4 sec 12856 KBytes 10132 Kbits/sec

Server screen Output:

————————————————————
Server listening on TCP port 5001
TCP window size: 85.3 KByte (default)
————————————————————
[ 4] local 10.3.3.3 port 5001 connected with 10.2.2.2 port 41974
————————————————————
Client connecting to 10.2.2.2, TCP port 5001
TCP window size: 16.0 KByte (default)
————————————————————
[ 6] local 10.3.3.3 port 40886 connected with 10.2.2.2 port 5001
[ 6] 0.0-10.4 sec 12.6 MBytes 10.2 Mbits/sec
[ 4] 0.0-10.7 sec 37.0 MBytes 28.9 Mbits/sec

3) Set up the iperf client on Windows

Download the JPerf client http://xjperf.googlecode.com/files/jperf-2.0.2.zip

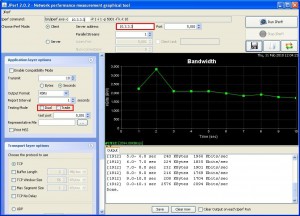
Unzip and Run the jperf.bat, you will see a graphical interface, just enter the ip of the server and you are good to go.

You can adjust your client’s options, Dual = -d , Trade= -r in the command line client:

Server screen Output:

————————————————————
Server listening on TCP port 5001
TCP window size: 85.3 KByte (default)
————————————————————
[ 4] local 10.3.3.3 port 5001 connected with 10.4.4.4 port 2606
[ 4] 0.0-10.0 sec 2.52 MBytes 2.12 Mbits/sec