Technologist

Tech stuff about Cloud, DevOps, SysAdmin, Virtualization, SAN, Hardware, Scripting, Automation and Development

Browsing Posts in Systems

In order to secure your webserver traffic you need to enable SSL.
This allows the traffic to be encrypted between the server and the client.
This is done by installing an SSL certificate on the web server and configure the web server to serve its content over SSL.

For this guide I am using RHEL 5.3 64bit and Apache.

  1. Install mod_ssl and openssl-devel
  2. Generate a Private Key for the Web Server
  3. Generate a Certificate Signing Request
  4. Generating a Self Signed Certificate
  5. Installing the Private Key and Certificate into your Apache webserver
  6. Enable Virtual Hosts configuration files
  7. Configure the SSL Virtual Host configuration file
  8. Restart Apache


1. Install mod_ssl and openssl-devel

mod_ssl is an optional  module that provides strong cryptographic functions to Apache. For more info, look here

[root@server]# yum install mod_ssl openssl-devel

Copy the mod_ssl.so file to the apache modules directory if not placed there by the installation.

[root@server modules]# cp /usr/lib64/httpd/modules/mod_ssl.so /usr/local/apache2/modules/mod_ssl.so


2. Generate a Private Key for the Web Server

The following commands creates a 1024 -bit RSA private key encrypted with triple DES, it will ask for a passphrase, I entered anything temporarily as I will remove it, because  I don’t want to enter it every time Apache is restarted, but this means that you are removing the Triple DES encyrption, so make sure that the private key cannot be seen by anybody but you (root). Its a trade-off between security and convenience

[root@server ~]# mkdir /root/ssl
[root@server ~]# cd /root/ssl/
[root@server ssl]# openssl genrsa -des3 -out server.key 1024
Generating RSA private key, 1024 bit long modulus
………++++++
……………….++++++
e is 65537 (0x10001)
Enter pass phrase for server.key: <secret>
Verifying – Enter pass phrase for server.key: <secret>

Remove the passphrase from the private key (This is optional, I do it to prevent being prompted everytime Apache is restarted)

[root@server ssl]# cp server.key server.key.withpasswd

[root@server ssl]# openssl rsa -in server.key.withpasswd -out server.key

Enter pass phrase for server.key.withpasswd:

writing RSA key


3. Generate a Certificate Signing Request

The CSR is what you will send to a Certificate Authority, such as Verisign, Digicert, etc. They will verify the information and if valid they will send you a signed certificate to install in your webserver. (For a fee of course)

[root@server ssl]# openssl req -new -key server.key -out server.csr

You are about to be asked to enter information that will be incorporated

into your certificate request.

What you are about to enter is what is called a Distinguished Name or a DN.

There are quite a few fields but you can leave some blank

For some fields there will be a default value,

If you enter ‘.’, the field will be left blank.

—–

Country Name (2 letter code) [GB]:US

State or Province Name (full name) [Berkshire]:New York

Locality Name (eg, city) [Newbury]:NYC

Organization Name (eg, company) [My Company Ltd]: example

Organizational Unit Name (eg, section) []:IT

Common Name (eg, your name or your server’s hostname) []:server.example.org

Email Address []:admin@example.org

Please enter the following ‘extra’ attributes

to be sent with your certificate request

A challenge password []:

An optional company name []:


4. Generating a Self Signed Certificate

For a production website, you should use the certificate that is signed from a trusted certificate authority. Otherwise clients will get a warning stating that they should not trust your website.

But for testing purposes or if you don’t feel like paying a Certificate Authority (CA) for a signed certificate, you can generate your own Self Signed Certificate, this will provide the same protection and encryption as a CA signed certificate, but because a CA didn’t sign it,  clients will get a warning stating that they should not trust your website.

The following command will generate a Self Signed Certificate that is valid for 10968 days (3 years)

[root@server ssl]# openssl x509 -req -days 10968 -in server.csr -signkey server.key -out server.crt

Signature ok

subject=/C=US/ST=New York/L=NYC/O=EXAMPLE/OU=IT/CN=server.cpg.org/emailAddress=admin@example.org

Getting Private key


5. Installing the Private Key and Certificate into your Apache webserver

Just copy the .crt and .key file to a location accessible to Apache.

The .crt file is either the CA signed certificate or self signed certificate.

[root@server ssl]# cp server.crt /usr/local/apache2/conf/

[root@server ssl]# cp server.key /usr/local/apache2/conf/


6. Enable Virtual Hosts configuration files

In the Apache main configuration file enable the inclusion of virtual hosts files if they are not enabled by default, you can include one file or a wildcard (e.g. conf/*.conf)

Include conf/extra/httpd-ssl.conf


7. Configure the SSL Virtual Host configuration file

[root@server extra]# cat /usr/local/apache2/conf/extra/httpd-ssl.conf

LoadModule ssl_module modules/mod_ssl.so

Listen 443

AddType application/x-x509-ca-cert .crt

AddType application/x-pkcs7-crl    .crl

SSLPassPhraseDialog  builtin

SSLSessionCache        “shmcb:/usr/local/apache2/logs/ssl_scache(512000)”

SSLSessionCacheTimeout  300

SSLMutex  “file:/usr/local/apache2/logs/ssl_mutex”

<VirtualHost _default_:443>

DocumentRoot “/usr/local/apache2/htdocs”

ServerName server.example.org:443

ServerAdmin admin@example.org

ErrorLog “/usr/local/apache2/logs/error_ssl_log”

TransferLog “/usr/local/apache2/logs/access_ssl_log”

SSLEngine on

SSLCipherSuite ALL:!ADH:!EXPORT56:RC4+RSA:+HIGH:+MEDIUM:+LOW:+SSLv2:+EXP:+eNULL

SSLCertificateFile “/usr/local/apache2/conf/server.crt”

SSLCertificateKeyFile “/usr/local/apache2/conf/server.key”

<FilesMatch “\.(cgi|shtml|phtml|php)$”>

SSLOptions +StdEnvVars

</FilesMatch>

<Directory “/usr/local/apache2/cgi-bin”>

SSLOptions +StdEnvVars

</Directory>

BrowserMatch “.*MSIE.*” \

nokeepalive ssl-unclean-shutdown \

downgrade-1.0 force-response-1.0

CustomLog “/usr/local/apache2/logs/ssl_request_log” \

“%t %h %{SSL_PROTOCOL}x %{SSL_CIPHER}x \”%r\” %b”

</VirtualHost>


8. Restart Apache

[root@server modules]# service httpd restart

This guide aims to help administrators bind Red Hat Enterprise Linux systems to Sun One LDAP Directory server.

This is assuming you already have a working and populated Sun One LDAP Directory Server.

For this guide I am using:

LDAP Server:
Sun One LDAP Directory Server 5.2

LDAP Client:
RHEL 5.3 64bit

Sun ONE LDAP Server setup:
You will need a unique number for the UID and GID of every user. Think of a number that will be unique in your organization. Once you have agreed on what is going to be the unique number for each user then:

1) Open your SUN One Server Console and login

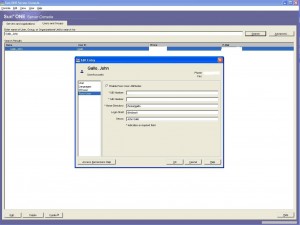
2) From the SUN One Console Go to “Users and Groups” and search for the user you want to be able to login to the RHEL system. Double click the user and go to Posix User Option and enter the following information:

Check Enable Posix User Attributes:
And enter the unique number for UID and GID
Also fill in:
/home/john
/bin/bash
Gecos:

Click OK and that should be it on the server side

RHEL configuration:

1) Ensure The following packages are installed
mozldap.x86_64
nss_ldap.i386
nss_ldap.x86_64
openldap.i386
openldap.x86_64
openldap-clients.x86_64
python-ldap.x86_64

2) Backup the following files
[root@rhelclient ~]# cp /etc/ldap.conf /etc/ldap.conf.orig
[root@rhelclient ~]# cp /etc/openldap/ldap.conf /etc/openldap/ldap.conf.orig
[root@rhelclient ~]# cp /etc/nsswitch.conf /etc/nsswitch.conf.orig
[root@rhelclient ~]# cp /etc/pam.d/system-auth /etc/pam.d/system-auth.orig

3) Configure authconfig to use the LDAP server:
[root@rhelclient ~]#  authconfig --enableldap --enableldapauth --ldapserver="ip_of_LDAP_server" --ldapbasedn="dc=example,dc=com" –kickstart

4) Check the files to make sure the changes took place (optional)
a. sed -e ‘/^#.*/d’ /etc/ldap.conf | sed -e ‘/^$/d’
b. sed -e ‘/^#.*/d’ /etc/openldap/ldap.conf | sed -e ‘/^$/d’
c. sed -e ‘/^#.*/d’ /etc/pam.d/system-auth | sed -e ‘/^$/d’
d. sed -e ‘/^#.*/d’ /etc/nsswitch.conf | sed -e ‘/^$/d’

5) Add the following to /etc/ssh/sshd_config to allow PAM authentication
PAMAuthenticationViaKbdInt yes

6) Now try to login the RHEL system using the LDAP user:
ssh john@rhelclient.example.com
Last login: Sat May 1 20:01:37 2010 from linuxbox.example.com
Could not chdir to home directory /home/john: No such file or directory
-bash-3.2$

The message “Could not chdir to home directory /home/john: No such file or directory” is because there is no home directory for the user, you can create a directory under /home for the user on the RHEL client and change the ownership to the UID: GID of the LDAP user.
Also copy the default skeleton files to the new home directory for the user.

[root@rhelclient ~]# mkdir /home/john
[root@rhelclient ~]# chown 2100:2100 /home/john
[root@rhelclient ~]# cp /etc/skel/.bash* /home/john/

A much elegant approach is to have the /home/* folders on a centralized location, like a NFS server and map them on the client automatically when a user logs in using the automounter. For this approach please see:
Automount Home Directories on NFS server

This post is aimed to help administrators to keep Linux home directories in a centralized location and mounting them when needed by using the Automounter.
NOTE: Each user should have unique uid/gid

NFS Server:
Any NFS Server will do just fine.
I will use NetApp NFS since this is for a production environment.
filer.example.com

RHEL Client:
RHEL 5.3 64bit
rhelbox.example.com

Users:
john uid=2100 gid=2100
alex uid=2101 gid=2101

NetApp NFS Server Setup:
1) Create a volume to host your home directories

filer> vol create homedirs aggr1 200g

2) Enter the following in your /etc/exports file to export this to the specific RHEL client.

filer> exportfs -p rw=rhelbox.example.com,root=rhelbox.example.com /vol/homedirs
filer> exportfs -a

RHEL Client Configuration:

1) As root mount the volume anywhere in the system. (This is only to create the home directories and assign the proper ownership, then unmount.)
[root@rhelbox ~]# mkdir /mnt/homedirs
[root@rhelbox ~]# mount ny1afilerd1:/vol/homedirs /mnt/homedirs/
[root@rhelbox ~]# mount

filer:/vol/homedirs on /mnt/homedirs type nfs (rw,addr=rhelbox.example.com)

2) Create the home directories and assign proper ownership
[root@rhelbox ~]# mkdir /mnt/homedirs/{john,alex}

[root@rhelbox ~]# id john
uid=2100(john) gid=2100 groups=2100
[root@rhelbox ~]# chown 2100:2100 /mnt/homedirs/john/

[root@rhelbox ~]# id alex
uid=2101(alex) gid=2101 groups=2101
[root@rhelbox~]# chown 2101:2101 /mnt/homedirs/alex/

3) Copy the files from /etc/skel to the new home directory
[root@rhelbox ~]# for i in john alex; do cp /etc/skel/.* /mnt/homedirs/$i/; done

4) Unmount the temporary folder
[root@rhelbox~]# umount /mnt/homedirs
[root@rhelbox~]# rmdir /mnt/homedirs

5) Configure the Automounter
Enter the following in /etc/auto.master
/home /etc/auto.home –timeout=60

Create /etc/auto.home and populate as follows:
* -fstype=nfs,rw,nosuid,soft filer.example.com:/vol/homedirs/&

6) Restart the automounter
[root@rhelbox ~]# service autofs restart

7) That should be it, lets give it a try
[root@rhelbox ~]# su – john
[john@rhelbox ~]$ ls -A
.bash_history .bash_logout .bash_profile .bashrc

Problem:
I needed to send confidential data to other people via the Internet, so it needs to be encrypted.

Solution:
GPG is the free implementation of the OpenPGP(Preety Good Privacy) standard defined by RFC4880.
It provides a way to encrypt data using a public/private key infrastructure. You can set a Web of Trust with the people you need to share data, get their public keys, send them your public key and start encrypting and decrypting as I will show you in this guide.
GPG is available is diferent platforms including Linux, MAC, Windows(Binary version as well as in Cygwin).
you can use the OS of your choice, just make sure GPG is installed

For this demo I am using a Mac with OS 10.6

1) Make sure you have GPG installed, otherwise downloaded from http://gnupg.org/download/index.en.html
To check type:

mac:~ john$ gpg --version
gpg (GnuPG) 1.4.10
Copyright (C) 2008 Free Software Foundation, Inc.
License GPLv3+: GNU GPL version 3 or later 
This is free software: you are free to change and redistribute it.
There is NO WARRANTY, to the extent permitted by law.

Home: ~/.gnupg
Supported algorithms:
Pubkey: RSA, RSA-E, RSA-S, ELG-E, DSA
Cipher: 3DES, CAST5, BLOWFISH, AES, AES192, AES256, TWOFISH, CAMELLIA128, 
        CAMELLIA192, CAMELLIA256
Hash: MD5, SHA1, RIPEMD160, SHA256, SHA384, SHA512, SHA224
Compression: Uncompressed, ZIP, ZLIB, BZIP2
 

2) Generate your Private/Public Key Pair
CHOOSE THE ALGORITHM, NUMBER OF BITS AND EXPIRATION DATE (Defaults are fine)

mac:~ john$  gpg --gen-key
gpg (GnuPG) 1.4.10; Copyright (C) 2008 Free Software Foundation, Inc.
This is free software: you are free to change and redistribute it.
There is NO WARRANTY, to the extent permitted by law.

Please select what kind of key you want:
   (1) RSA and RSA (default)
   (2) DSA and Elgamal
   (3) DSA (sign only)
   (4) RSA (sign only)
Your selection? 1
RSA keys may be between 1024 and 4096 bits long.
What keysize do you want? (2048) 
Requested keysize is 2048 bits   
Please specify how long the key should be valid.
         0 = key does not expire
        = key expires in n days
      w = key expires in n weeks
      m = key expires in n months
      y = key expires in n years
Key is valid for? (0) 
Key does not expire at all
Is this correct? (y/N) y

You will get a warning about the expiration if you selected the default, which means it never expires.
If you want it to expire then change the value(eg 3m) will expire in 3 months.

                     
You need a user ID to identify your key; the software constructs the user ID
from the Real Name, Comment and Email Address in this form:
    "Heinrich Heine (Der Dichter) "

Enter Real Name, Email and a Comment.
Try to make this as unique as possible as this will have an inpact in how your key is identified

Real name: John
Email address: john@technologist.pro
Comment: Technologist               
You selected this USER-ID:
    "John (Technologist) "

Change (N)ame, (C)omment, (E)mail or (O)kay/(Q)uit? O
You need a Passphrase to protect your secret key.    

You don't want a passphrase - this is probably a *bad* idea!
I will do it anyway.  You can change your passphrase at any time,
using this program with the option "--edit-key".

Select an empty Passphrase UNLESS you dont mind to be prompted everytime for the passphrase
Now Just wait a few seconds while the key is generated, Move the mouse and type on the keyboard to increase the randomness.

We need to generate a lot of random bytes. It is a good idea to perform
some other action (type on the keyboard, move the mouse, utilize the
disks) during the prime generation; this gives the random number
generator a better chance to gain enough entropy.
+++++
.....+++++

In Case you get:
Not enough random bytes available.
Please do some other work to give the OS a chance to collect more entropy! (Need 284 more bytes)

DON’T PANIC, Just do stuff in your PC, write things to disk, log in to another terminal with a different user, etc.
Just do different things, that collect more entropy.

gpg: /Users/john/.gnupg/trustdb.gpg: trustdb created
gpg: key CAJD4CD7 marked as ultimately trusted
public and secret key created and signed.

gpg: checking the trustdb
gpg: 3 marginal(s) needed, 1 complete(s) needed, PGP trust model
gpg: depth: 0  valid:   1  signed:   0  trust: 0-, 0q, 0n, 0m, 0f, 1u
pub   2999R/CAJD4CD7 2010-03-04
      Key fingerprint = 901C XXXX 94F8 7332 XXXX  1DDA 2C07 B0A5 CE4D 4CD7
uid                  John  (Technologist) 
sub   2048R/ABBB7BDC 2010-03-04

OK the set up is done, Now we need to give people in our Web of Trust (Fancy terminology for “people we trust and trust us”) our public key so they can encrypt data with our public key, so we can open it using our Private Key and
we need to get their public key to encrypt data with their public key so that they can open it using their Private Key

For Example:
If I(John) need to send an encrypted document to Ann, I need to have her Public Key, Encrypt the Data with her Public key so she can decrypt it using her Private key. It’s all about the Private/Public Key Pairs.

3) Give the people you trust your public key and get their public key
You can get the public Key by any means, including the internet, email, etc.
The public key is supposed to be public, But on the other hand, guard your Private Key with your life, it should be only readable by the owner and no one else.

Check your keys by listing them:

mac:~ john$ gpg --list-keys
/Users/john/.gnupg/pubring.gpg
--------------------------------
pub   2999R/CAJD4CD7 2010-03-04
uid                  John (Technologist) 
sub   2048R/ABBB7BDC 2010-03-04

Now Export that key into a file:
-r option tells gpg which public key to export in case you generated more than one Private/Public Key Pairs.
-o tells the output filename
–armor option is to output in a format that is understood by many applications, otherwise it will be output in gpg raw format

mac:~ john$ gpg --export -r "John Technologist" --armor -o JohnTechnologist.pub

The contents of the file should look like this:

—–BEGIN PGP PUBLIC KEY BLOCK—–
Version: GnuPG v1.4.10 (Darwin)

mXENBEuXCxsBCADVTdygxzkXHRgOq+i+0b7LF/pilPPJSaO1I8k1Yspa8b5onYio
1JzzPZNj2ptjnzay1tjUuLwX0tvvsG+PCBKqQLMz0ozampIjDXj379p837Omx9TV
OBFPibXazwpZEP1bBK7p6siyDh0Q72pq0zJbhwR4ptcwNheNLnN2hfAiJRTSohZo
0cbg6FRrCBCYU58cemco7QhiFcrZSY1KNzhhiQUXuAvRvoQ54FSAtTJBpEH/wkuF
WhNK+SHkn/+e99cQ4NQW8ncgrrJEYAdFvIOlABEBAAG0MUpvaG4gR2FsbG8gKFRl
Y2hub2xvZ2lzdCkgPGpvaG5AdGVjaG5vbG9naXN0LnBybz6JATgEEwECACIFAkuQ
5LaLgEs3P8KzUGbVfD41qEtLrobqG8VBuJcob4sy4FOYSW+H2tT4/XZ0n6lkTi8H
TvzTekiO3K9S1hIg+eHwNJgV8reQdRPvEuPhoOehqfHC77e11RhV2bn84mKVRoVl
VY1DkE46fz+pVqA5GSsfi7vLMIVvX/koDCbizkmxNOktdXP3ds+i7y1mIv+WEEb+
1NQYJNIZmNnmW9e6eg3mAjf99ruepd+r2OP0hBgLWxypPKsjz7VXmqiwbilzkqM5
axJPL2IP4OwRBIjV9hv5fpV17MPbdHmTh0JXGfnSMGEZai7CIpbSOWQY/nnhOjht
PQQO2xGRTcWmIwySqzCFmSiUIdONnuqwBpY5OrSTe00i//yDY/VZfZwg8qsChh3b
jlb9CRvAM6/CZFFKzkm5AQ0ES5ALGwEIAKpF1iJj0k3XvemTb+ze11SJa+Z/Rr+V
19Z7GVgTYOwu4DrNjrPuecOQ9hSzO8aWhZTpTOR9XlPcnFhgz1YKBZbHr8s/SP5r
7vlRxmE3kqEXtZ7R5IT35R6t+FJSY9H7cndcKSYQQFynAyFqslPIvEqONtWnPORn
pCEp+K5mPRiUfcObtd0TuR/C0tVUGViVs+PhVhSnoU7V6aEQNLHC4+ltsqhOSbMZ
FB3LWYGuQ33Rh4O/3raB/0ZBTKWl7nmBXyNHO6MpPQGQxSlpXPQKLukWoKIKErhX
Obs+of0Mn/dIU/vRxdtYOZ6cg1oIp0zcpzw7sYddw2AoftfH51L5h/MAEQEAAYkB
HwQYAQIACQUCS5ALGwIbDAAKCRAsB7Clzk1M19taCACSGcHuvyW0HqCyrNLO9Knj
hfAZp0OxxGBiOQbjwdG/DIeUfH9kSIlUEW8aYHUkpzYrPWMsuXy/AdeWyqy54wgD
zxmQb7SogwG2AqzLX2KoiyHJuWleRc9dxbCgByqQyPYyEfVWZykDlNueaZ1NyfQn
MFn5YqxbCBZHpo4hw5XhPJFwP8/kVjT2bQ0ctSPk5USxtxHEyP6vByEpuuBRJTEe
nHlK7/V7WJNnNQPeg6DlvA/TjsQPmuxbodxVkt04dvwoJkBiQIVsRoPRnX0VvoA1
GeLSaCyUIKWA3YnnSuGYKmQyHD9EmZPxiCGPL4tMzvjNUfJsde1QfbjsJ5W2Ti+T
=be1t
—–END PGP PUBLIC KEY BLOCK—–

4) Send that public key file to your friend and your friend will send you his public key exported from his system.
When you get his Public Key (his file), then you need to import it into your key ring like this:
Lets say Ann Dexter sent me through email her public key file called AnnDexter.pub

mac:~ john$ gpg --import AnnDexter.pub

Listing the keys will yield

mac:~ john$ gpg --list-keys
/Users/john/.gnupg/pubring.gpg
--------------------------------
pub   2999R/CAJD4CD7 2010-03-04
uid                  John (Technologist) 
sub   2048R/ABBB7BDC 2010-03-04

pub 1024D/9B2A3DA2 2008-04-01 
uid Ann Dexter (Systems) 
sub 2048g/AB00C1A4 2008-04-01

5) We want to encrypt secret.txt using Ann’s Pubilc Key
And it is as simple as:

mac:~ john$ gpg --encrypt --sign --armor -r "Ann Dexter" secret.txt

This will generate a secret.txt.asc file which is the encrypted version of secret.txt AND Signed so the recipient can verify it came from you
This file can ONLY be decrypted with Ann Dexter PRIVATE KEY, you CAN’T decrypt it because you ONLY posses Ann Dexter’s Public Key but NOT her Private Key.

Now You can send the secret.txt.asc to Ann using any means you want, email, ftp, etc.

6) Ann Dexter got your encrypted file, how does she decrypt it?
Since she posseses the Private Key she can just do the following:

[ann@remoteSystem]$ gpg --decrypt -o secret.txt secret.txt.asc

And She will get the following the following output indicating that the Private key was used to Decrypt the file.

gpg: encrypted with 2048-bit ELG-E key, ID AB00C1A4, created 2008-04-01 “Ann Dexter (Systems) ”

Ann should now have the secret.txt file ready and decrypted

This guide helps measure the network throughput and bandwidth between two hosts in the same network, different networks and across different data centers.

This specifically helped me when I needed to know how much throughput the company network had between headquarters data center and the Disaster Recovery data center which where in different states and I wanted to calculate how long would it take to replicate our SAN between the sites, about 60TB of data.

The tool I used for this is called iPerf (http://sourceforge.net/projects/iperf/), this tool includes both the Server and Client, I am running this tool from a RHEL 5.3 system.

You can find a RHEL/Centos binary for this tool at http://dag.wieers.com/rpm/packages/iperf/

A Java based Graphical iperf tool can be found at http://code.google.com/p/xjperf/downloads/list, which can be run on a Windows system, with the Java runtime environment.

Now let’s get to the steps on how to measure network throughput.

1) Set up the iperf server

I am utilizing a RHEL 5.3 for the server.

Install iperf:

[root@remote]# rpm -Uvh http://dag.wieers.com/rpm/packages/iperf/iperf-2.0.2-2.el5.rf.x86_64.rpm

Run iperf as server:

[root@remote ~]# iperf -s
————————————————————
Server listening on TCP port 5001
TCP window size: 85.3 KByte (default)
————————————————————

Now that the iperf server is running, install the client at the other office.

2) Set up the iperf client on RHEL

Install iperf on RHEL:

[root@local]# rpm -Uvh http://dag.wieers.com/rpm/packages/iperf/iperf-2.0.2-2.el5.rf.x86_64.rpm

Run iperf as client on RHEL:

iperf has many great options, you can see all the options by doing # iperf -h

I usually use the following options to determine throughput:

[root@local ~]# iperf -c 10.3.3.3 -fk // 10.3.3.3 is the remote server -fk is to present as kbps
————————————————————
Client connecting to 10.3.3.3, TCP port 5001
TCP window size: 16.0 KByte (default)
————————————————————
[ 3] local 10.2.2.2 port 38124 connected with 10.3.3.3 port 5001
[ ID] Interval Transfer Bandwidth
[ 3] 0.0-10.3 sec 37680 KBytes 30029 Kbits/sec

Server screen Output:

————————————————————
Server listening on TCP port 5001
TCP window size: 85.3 KByte (default)
————————————————————
[ 4] local 10.3.3.3 port 5001 connected with 10.2.2.2 port 38124
[ 4] 0.0-10.9 sec 36.8 MBytes 28.3 Mbits/sec

Using the -r option to “Do a bidirectional test individually”

[root@local ~]# iperf -c 10.3.3.3 -fk -r
————————————————————
Server listening on TCP port 5001
TCP window size: 85.3 KByte (default)
————————————————————
————————————————————
Client connecting to 10.3.3.3, TCP port 5001
TCP window size: 16.0 KByte (default)
————————————————————
[ 5] local 10.2.2.2 port 41973 connected with 10.3.3.3 port 5001
[ ID] Interval Transfer Bandwidth
[ 5] 0.0-10.1 sec 27744 KBytes 22580 Kbits/sec
[ 4] local 10.2.2.2 port 5001 connected with 10.3.3.3 port 55521
[ 4] 0.0-10.1 sec 48160 KBytes 39093 Kbits/sec

Server screen Output:

————————————————————
Server listening on TCP port 5001
TCP window size: 85.3 KByte (default)
————————————————————
[ 4] local 10.3.3.3 port 5001 connected with 10.2.2.2 port 41973
[ 4] 0.0-10.7 sec 27.1 MBytes 21.3 Mbits/sec
————————————————————
Client connecting to 10.2.2.2, TCP port 5001
TCP window size: 16.0 KByte (default)
————————————————————
[ 4] local 10.3.3.3 port 55521 connected with 10.2.2.2 port 5001
[ 4] 0.0-10.0 sec 47.0 MBytes 39.3 Mbits/sec

Using the -d option to “Do a bidirectional test simultaneously”

[root@local ~]# iperf -c 10.3.3.3 -fk -d
————————————————————
Server listening on TCP port 5001
TCP window size: 85.3 KByte (default)
————————————————————
————————————————————
Client connecting to 10.3.3.3, TCP port 5001
TCP window size: 16.0 KByte (default)
————————————————————
[ 5] local 10.2.2.2 port 41974 connected with 10.3.3.3 port 5001
[ 4] local 10.2.2.2 port 5001 connected with 10.3.3.3 port 40886
[ ID] Interval Transfer Bandwidth
[ 5] 0.0-10.1 sec 37872 KBytes 30648 Kbits/sec
[ 4] 0.0-10.4 sec 12856 KBytes 10132 Kbits/sec

Server screen Output:

————————————————————
Server listening on TCP port 5001
TCP window size: 85.3 KByte (default)
————————————————————
[ 4] local 10.3.3.3 port 5001 connected with 10.2.2.2 port 41974
————————————————————
Client connecting to 10.2.2.2, TCP port 5001
TCP window size: 16.0 KByte (default)
————————————————————
[ 6] local 10.3.3.3 port 40886 connected with 10.2.2.2 port 5001
[ 6] 0.0-10.4 sec 12.6 MBytes 10.2 Mbits/sec
[ 4] 0.0-10.7 sec 37.0 MBytes 28.9 Mbits/sec

3) Set up the iperf client on Windows

Download the JPerf client http://xjperf.googlecode.com/files/jperf-2.0.2.zip

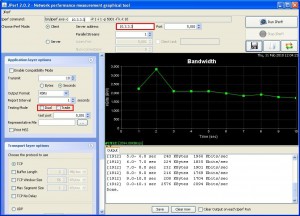
Unzip and Run the jperf.bat, you will see a graphical interface, just enter the ip of the server and you are good to go.

You can adjust your client’s options, Dual = -d , Trade= -r in the command line client:

Server screen Output:

————————————————————
Server listening on TCP port 5001
TCP window size: 85.3 KByte (default)
————————————————————
[ 4] local 10.3.3.3 port 5001 connected with 10.4.4.4 port 2606
[ 4] 0.0-10.0 sec 2.52 MBytes 2.12 Mbits/sec

This posting will help you configuring multipathing on RHEL 5.3 for LUNs carved from a NetApp SAN. For this guide I am using a C-Class blade system with QLogic HBA cards.

1) Make sure you have the packages needed by RHEL, otherwise install them.

rpm -q device-mapper
rpm -q device-mappermultipath
yum install device-mapper
yum install device-mapper-multipath

2) Install QLogic Drivers if needed, or utilize RHEL drivers. In my case I am using HP C-Class blades with Qlogic HBA cards. HP drivers can be found at the HP site, driver is called hp_sansurfer. I am utilizing RHEL built in drivers, but you can install the HP/QLogic drivers as follows:

rpm -Uvh hp_sansurfer-5.0.1b45-1.x86_64.rpm

3) If Qlogic HBA, install the SanSurfer CLI, this is very useful program for doing things with QLogic HBA cards, it can be downloaded at QLogic website, install as follows:

rpm -Uvh scli-1.7.3-14.i386.rpm

4) Install NetApp Host Utilities Kit, the package is a tar.gz file, you can find it at the now site http://now.netapp.com.

Open it and run the install shell script

netapp_linux_host_utilities_5_0.tar.gz

5) Once Everything is installed on the host, create the LUN and ZONE it from the NetApp, Brocade(SAN Fabric),Host

To find your WWPNs, use the scli as follows:
# scli –i all
// Use the WWPN numbers for the iGroup and Brocade Aliases

6) Once it has been Zoned and mapped correctly, verify if your RHEL host can see it.

// Rescan HBA for new SAN Luns

# modprobe -r qla2xxx
# modprobe qla2xxx
// Check the kernel can see it
# cat /proc/scsi/scsi
# fdisk –lu

7) Utilize NetApp tools to see LUN connectivity

// Check your host and utilities see the LUNs
[root@server ~]# sanlun lun show
controller:          lun-pathname          device filename  adapter  protocol          lun size                                      lun state
NETAPPFILER:  /vol/servervol/serverlun  /dev/sdf         host6    FCP          100g (107374182                             400)   GOOD
NETAPPFILER:  /vol/servervol/serverlun  /dev/sda         host4    FCP          100g (107374182                             400)   GOOD
NETAPPFILER:  /vol/servervol/serverlun  /dev/sde         host6    FCP          100g (107374182                             400)   GOOD
NETAPPFILER:  /vol/servervol/serverlun  /dev/sdc         host5    FCP          100g (107374182                             400)   GOOD
NETAPPFILER:  /vol/servervol/serverlun  /dev/sdd         host5    FCP          100g (107374182                             400)   GOOD
NETAPPFILER:  /vol/servervol/serverlun  /dev/sdb         host4    FCP          100g (107374182                             400)   GOOD
.

8 ) Utilize NetApp tools to check multipathing, not set yet

[root@server ~]# sanlun lun show -p
NETAPPFILER:/vol/servervol/serverlun (LUN 0)                Lun state: GOOD
Lun Size:    100g (107374182400) Controller_CF_State: Cluster Enabled
Protocol: FCP           Controller Partner: NETAPPFILER2
Multipath-provider: NONE
--------- ---------- ------- ------------ --------------------------------------------- ---------------
   sanlun Controller                                                            Primary         Partner
   path         Path   /dev/         Host                                    Controller      Controller
   state        type    node          HBA                                          port            port
--------- ---------- ------- ------------ --------------------------------------------- ---------------
     GOOD  primary       sdf        host6                                            0c              --
     GOOD  secondary     sda        host4                                            --              0c
     GOOD  secondary     sde        host6                                            --              0c
     GOOD  secondary     sdc        host5                                            --              0d
     GOOD  primary       sdd        host5                                            0d              --
     GOOD  primary       sdb        host4                                            0c              --

Time to configure multipathing

9) Start the multipath daemon

# service multipathd start

10) Find you WWID, this will be needed in the configuration if you want to alias it.

Comment out the blacklist in the default /etc/multipath.conf, otherwise you will NOT see anything.

#blacklist {
#        devnode "*"
#}
// Show your devices and paths, and record the WWID of the LUN
# multipath -v3
...
...
===== paths list =====
uuid                              hcil    dev dev_t pri dm_st  chk_st  vend/pr
360a98000486e576748345276376a4d41 4:0:0:0 sda 8:0   1   [undef][ready] NETAPP,
360a98000486e576748345276376a4d41 4:0:1:0 sdb 8:16  4   [undef][ready] NETAPP,
360a98000486e576748345276376a4d41 5:0:0:0 sdc 8:32  1   [undef][ready] NETAPP,
360a98000486e576748345276376a4d41 5:0:1:0 sdd 8:48  4   [undef][ready] NETAPP,
360a98000486e576748345276376a4d41 6:0:0:0 sde 8:64  1   [undef][ready] NETAPP,
360a98000486e576748345276376a4d41 6:0:1:0 sdf 8:80  4   [undef][ready] NETAPP,
...
...

11) Now you are ready to configure /etc/multipath.conf

Exclude (blacklist) all the devices that do not correspond to any
LUNs configured on the storage controller and which are mapped to
your Linux host. There are 2 methods:
Block by WWID
Block by devnode
In this case I am blocking by devnode since I am using HP and know my devnode RegEx
Also configure the device and alias(optional).
The full /etc/multipath.conf will look like this:


defaults
{
        user_friendly_names yes
        max_fds max
        queue_without_daemon no
}
blacklist {
        ###devnode "*"
           devnode "^(ram|raw|loop|fd|md|dm-|sr|scd|st)[0-9]*"
           devnode "^hd[a-z]"
           devnode "^cciss!c[0-9]d[0-9]*"  # Note the cciss, usual in HP
}
multipaths {
        multipath {
                wwid    360a98000486e57674834527533455570    # You found this
                alias   netapp # This is how you want to name the device in your host
                               # server LUN on NETAPPFILER
        }
}
devices
{
        device
        {
        vendor "NETAPP"
        product "LUN"
        getuid_callout "/sbin/scsi_id -g -u -s /block/%n"
        prio_callout "/sbin/mpath_prio_ontap /dev/%n"
        features "1 queue_if_no_path"
        hardware_handler "0"
        path_grouping_policy group_by_prio
        failback immediate
        rr_weight uniform
        rr_min_io 128
        path_checker directio
        flush_on_last_del yes
}
}

12) Restart multipath and make sure it starts automatically:

// Restart multipath
# service multipathd restart
// Add to startup
# chkconfig --add multipathd
# chkconfig multipathd on

13) Verify multipath is working

//RHEL tools 
[root@server scli]# multipath -l
netapp (360a98000486e576748345276376a4d41) dm-2 NETAPP,LUN
[size=100G][features=1 queue_if_no_path][hwhandler=0][rw]
\_ round-robin 0 [prio=0][active]
 \_ 4:0:1:0 sdb 8:16  [active][undef]
 \_ 5:0:1:0 sdd 8:48  [active][undef]
 \_ 6:0:1:0 sdf 8:80  [active][undef]
\_ round-robin 0 [prio=0][enabled]
 \_ 4:0:0:0 sda 8:0   [active][undef]
 \_ 5:0:0:0 sdc 8:32  [active][undef]
 \_ 6:0:0:0 sde 8:64  [active][undef]
//NetApp utilities Tool 
 [root@server scli]# sanlun lun show -p
NETAPPFILER:/vol/servervol/serverlun (LUN 0)                Lun state: GOOD
Lun Size:    100g (107374182400) Controller_CF_State: Cluster Enabled
Protocol: FCP           Controller Partner: NETAPPFILER2
DM-MP DevName: netapp   (360a98000486e576748345276376a4d41)     dm-2
Multipath-provider: NATIVE
--------- ---------- ------- ------------ --------------------------------------------- ---------------
   sanlun Controller                                                            Primary         Partner

    state       type    node          HBA                                          port            port
--------- ---------- ------- ------------ --------------------------------------------- ---------------
     GOOD  primary       sdb        host4                                            0c              --
     GOOD  primary       sdd        host5                                            0d              --
     GOOD  primary       sdf        host6                                            0c              --
     GOOD  secondary     sda        host4                                            --              0c
     GOOD  secondary     sdc        host5                                            --              0d
     GOOD  secondary     sde        host6                                            --              0c
...

14) Now you can access the LUN by using the mapper

 [root@server scli]# ls -l /dev/mapper
total 0
crw------- 1 root root  10, 63 Sep 12 12:32 control
brw-rw---- 1 root disk 253,  2 Sep 16 10:54 netapp
brw-rw---- 1 root disk 253,  0 Sep 12 16:32 VolGroup00-LogVol00
brw-rw---- 1 root disk 253,  1 Sep 12 12:32 VolGroup00-LogVol01

15) Format it to your liking and mount it

# mkdir /mnt/netapp
# mkfs -t ext3 /dev/mapper/netapp
# mount /dev/mapper/netapp /mnt/netapp/
//verify it mounted
# mount
...
...
/dev/mapper/netapp on /mnt/netapp type ext3 (rw)
...

16 ) If you want it to be persistent after reboots put it on /etc/fstab and make sure multipathd start automatically.

# cat /etc/fstab
...
...
/dev/mapper/netapp      /mnt/netapp             ext3    defaults        0 0

17) If possible reboot to check it mounts correctly after reboots.

You have added a new disk or increased the size of your LUN, or increased the size of the virtual disk in case of virtual machines, and now you need to increase the partition, the Logical Volume and the filesystem in order to be able to use the new space.

In this post I go through the steps necessary to make this happen in a RHEL 5.3 system.

The LUN I will increase has 20GB and it had an LVM partition. I decided to increase the LUN size to 72GB and this is how it looks now.

[root@server~]# fdisk -lu
Disk /dev/sdb: 77.3 GB, 77309411328 bytes
255 heads, 63 sectors/track, 9399 cylinders
Units = cylinders of 16065 * 512 = 8225280 bytes

Device Boot Start End Blocks Id System
/dev/sdb1 * 1 2611 20971488 8e Linux LVM

I need to perform the following steps in order to be able to use the new space.

1. Increase the size of the partition using fdisk

[root@server ~]# fdisk /dev/sdb

Command (m for help): u //Change the display to sectors
Changing display/entry units to sectors
Command (m for help): p //Print the current partition table for that drive
Disk /dev/sdb: 77.3 GB, 77309411328 bytes
255 heads, 63 sectors/track, 9399 cylinders, total 150994944 sectors
Units = sectors of 1 * 512 = 512 bytes
Device Boot Start End Blocks Id System
/dev/sdb1 * 64 41943039 20971488 8e Linux LVM
Command (m for help): d //Delete the partition information, we will recreate
Selected partition 1
Command (m for help): n //Create partition
Command action
e extended
p primary partition (1-4)
p //In this case it is primary
Partition number (1-4): 1 // In this case it is the first partition on the drive
First sector (63-150994943, default 63): 64 //Align partition if used on NetApp
Last sector or +size or +sizeM or +sizeK (64-150994943, default 150994943):
Using default value 150994943
Command (m for help): t //Change type from Linux(default) to Linux LVM
Selected partition 1
Hex code (type L to list codes): 8e //Linux LVM partition type
Changed system type of partition 1 to 8e (Linux LVM)
Command (m for help): p //Print again to double check
Disk /dev/sdb: 77.3 GB, 77309411328 bytes
255 heads, 63 sectors/track, 9399 cylinders
Units = cylinders of 16065 * 512 = 8225280 bytes
Device Boot Start End Blocks Id System
/dev/sdb1 1 9400 75497440 8e Linux LVM
Command (m for help): w //Write the partition table
The partition table has been altered!
Calling ioctl() to re-read partition table.
WARNING: Re-reading the partition table failed with error 16: Device or resource busy.
The kernel still uses the old table.
The new table will be used at the next reboot.
Syncing disks.

2. You need to reboot for the changes to take place, or just run

server# partprobe

3. Make LVM acknowledge the new space

[root@server ~]# pvresize /dev/sdb1

4. Check that the Volume group shows the new space

[root@server ~]# vgs
VG #PV #LV #SN Attr VSize VFree
vg0 1 2 0 wz–n- 71.97G 52.00G

5. Extend the logical volume:
make it total of 28G in this example

[root@server~]# lvresize -L 28G /dev/mapper/vg0-lvhome
Extending logical volume lvhome to 28.00 GB
Logical volume lvswap successfully resized

You can also take all the free space available

[root@server ~]# lvresize -l +100%FREE /dev/mapper/vg0-lvhome
Extending logical volume lvhome to 67.97 GB
Logical volume lvhome successfully resized

6. Use the rest for whatever partition you want

[root@server~]# lvcreate -l 100%FREE -n lvdata vg0

7. Resize the Filesystem

[root@server~]# resize2fs /dev/mapper/vg0-lvhome
resize2fs 1.39 (29-May-2006)
Filesystem at /dev/mapper/vg0-lvhome is mounted on /home; on-line resizing required
Performing an on-line resize of /dev/mapper/vg0-lvhome to 9953280 (4k) blocks.
The filesystem on /dev/mapper/vg0-lvhome is now 9953280 blocks long.